About
Minecraft Datapacks is a community-driven Minecraft server about datapacks.
But datapacks are prone to conflicts, which means we need a way to ensure compatibility between many datapacks to create a stable and friendly datapack ecosystem.
How we are going to do it
To achieve this, we decide to create the Datapack Conventions, which will help improve compatibility between datapacks.
Contribution
If you wish to contribute to this project, you can do it via this Github repository.
As of right now, there are 3 types of contribution: Grammar Contributions, Tips Contributions and Convention Contributions.
- A Grammar Contribution is a simple grammar correction pull-request. Anyone can make this contribution if they notice grammar errors.
- A Tips Contribution is a contribution to the "tips" section of this repository, similar to Grammar Contributions you need to make a pull-request and wait for the approval.
- A Convention Contribution is a contribution to the "conventions" section of this repository. To contribute to the conventions, please read the below section.
Convention Contribution
To contribute to the official conventions, you must first create an issue with the Convention Suggestion label in this format:
- explanation of the convention.
- explanation on how to implement it.
- explanation of why it should be added.
After that, we will discuss it, modify it, then vote on whether to add it or not. If the vote passed, you can then submit a pull-request and wait for the approval.
Becoming Datapack Reviewer
While the process for selecting a reviewer has not been finalized yet, you can contact Boomber#5154 inside discord.
Official Conventions
These are the official conventions that everyone should follow for datapack compatibility.
Datapack Advancement (*)
About
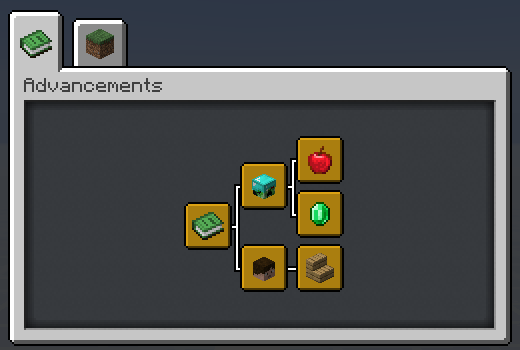
This convention aims to generalize installation messages in an easily viewable and non-obstructive way by putting it on a single advancement page.
Preview
This is an example of what this convention will look like.
Implementation
This guideline defines 3 advancement nodes: Root, Namespace and Datapack.
1. Root Advancement
This advancement is the root of all installed datapacks' advancements.
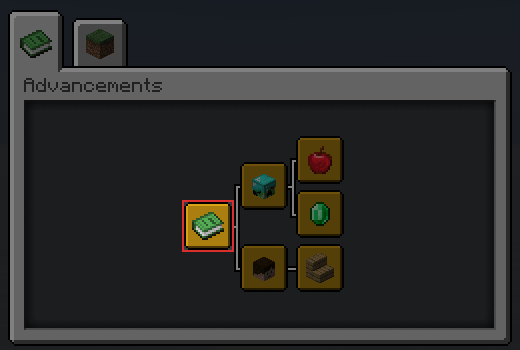
You must create this file at /data/global/advancements/root.json.
{
    "display": {
        "title": "Installed Datapacks",
        "description": "",
        "icon": {
            "item": "minecraft:knowledge_book"
        },
        "background": "minecraft:textures/block/gray_concrete.png",
        "show_toast": false,
        "announce_to_chat": false
    },
    "criteria": {
        "trigger": {
            "trigger": "minecraft:tick"
        }
    }
}
2. Namespace Advancement
This advancement indicates the creator of the datapack.
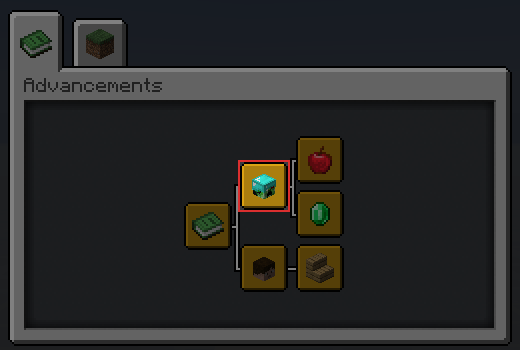
It must be in the same location in every datapack of yours. I recommend that you put it inside /data/global/advancements/<namespace>.json.
{
    "display": {
        "title": "<Your name>",
        "description": "",
        "icon": {
            "item": "minecraft:player_head",
            "nbt": "{SkullOwner: '<your_minecraft_name>'}"
        },
        "show_toast": false,
        "announce_to_chat": false
    },
    "parent": "global:root",
    "criteria": {
        "trigger": {
            "trigger": "minecraft:tick"
        }
    }
}
Note
If you are working on a project with multiple people you can choose to:
- Display this advancement as your own and credit them with other methods.
- Display this advancement with the "team name" of your choice.
- Display a "Standalone Datapack" instead.
3. Datapack Advancement
This advancement is used to display installation information about your datapack. It should be unique among your datapacks.
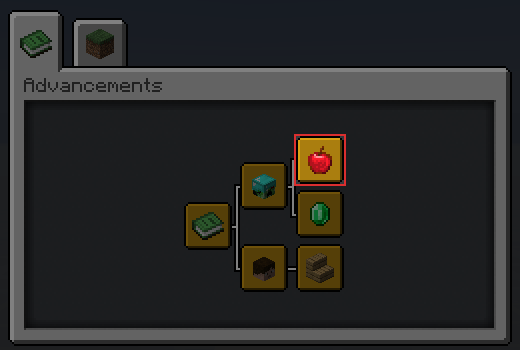
You can create this advancement anywhere, as long as you don't pollute /data/global/advancements/folder.
{
    "display": {
        "title": "<datapack name>",
        "description": "<datapack description>",
        "icon": {
            "item": "<item>"
        },
        "announce_to_chat": false,
        "show_toast": false
    },
    "parent": "global:<namespace>",
    "criteria": {
        "trigger": {
            "trigger": "minecraft:tick"
        }
    }
}
Note
The syntax <...> indicates that you have to replace it with something else!
Extra: Standalone Datapack
This is an optional syntax that you can take to display an installed datapack without displaying the creator's information.
To implement this you simply skip the #2: Namespace Advancement step and make sure that in step #3: Datapack Advancement you create your file inside the /data/global/advancements/standalone/ directory.
Keep in mind that if you are planning to release more datapacks under this name, you should use the normal syntax over this one.
Datapack Uninstallation (*)
About
This convention ensures that you have a way of uninstalling most of the contents of your datapack. The word "most" is used here because Minecraft does not provide the necessary tools for us to actually uninstall or remove the entirety of the datapack.
Implementation
There are no rules enforcing how you should implement the uninstallation method, as long as you do implement it. However, the following section outlines one of the many ways to implement it.
Uninstallation Function
You can create an "uninstallation function", which when ran, will remove most of the content added from your datapack. You can tell the user about this function inside your project page or anywhere you like.
Common Trait Convention (**)
About
This convention is intended to bring the Ore Dictionary system from Forge to datapack's custom items. This is done by utilizing the Item's custom NBT feature. We can insert any kind of NBT inside the Item, which we can access using other commands.
With that, we can create a unified lookup system that every datapack can use to search for a specific item they want. You can then use the Common Trait Convention's provided syntax to construct a search function to find the item you need.
Example Usage
It can be hard to visualize how this convention would be useful in the real world, so we compiled some useful usage that would not be possible without this convention.
- Suppose you added a
custom furnacewhich let you smelt copper ore into ingots. With this convention, you can detect for any copper ore from any datapacks to smelt it. - Suppose you added a
fridgeblock that only accepts food items. With this convention, you can detect any food items, even the custom ones from other datapacks. - Suppose you added a
custom anvilwhich lets you repair tools straight from the material instead of the ingot. With this convention, you can detect any kind of material from other datapacks, even when the base material doesn't match.
Traits
Traits represent behavior and properties that an object can have. By specifying these traits inside the item's NBT, other datapacks will be able to refer to that item via traits instead of item IDs directly.
Traits are a compound tag of strings to booleans and so will look like this in NBT (notice traits: {...}?)
/give @s diamond{ctc: {traits: {"some": 1b, "trait": 1b, "here": 1b}, id: "example", from: "convention:wiki"}}
Do note that there is no underlying mechanic that separates traits from any general NBT in the minecraft engine, we are creating this mechanic ourselves.
Syntax
Common Trait Convention's syntax will be stored inside the ctc NBT of an item. Inside ctc are the NBT tags: id, from and traits.
id: The internal ID of your item. This doesn't matter outside your datapack, but should be unique within your datapack.from: A namespace specifying which datapack the item comes from.traits: A set of traits.
For example, We will use an expanded form of the NBT used in /give command for readability. (but it's actually compacted into one line)
/give @s minecraft:iron_ore{
    ctc: {
        id: "my_copper_ore",
        from: "convention:wiki",
        traits: {"metal/copper": 1b, "block": 1b, "ore": 1b}
    }
} 1
Minecraft does not have a
setdata type, so we replicate it using a compound tag. This means every trait must have a value of1bortrueto stay consistent.
Let's look at these traits:
metal/copper. This trait tells us that this item is copper.block. This trait tells us that this item is a placeable block.ore. This trait tells us that this item is an ore.
Note
- When you are attempting to check for a custom item using
idtag must be done alongsidefromtag as well, you cannot separate it because it would break compatibility. - The opposite of the above is not true, you can check for
fromtag without requiringidtag. - If you use
idtag to check for a custom item, there is no need to check fortraitstag as well.
Slash Notation
In the above example, you will notice the use of / in metal/copper. This is used for categorization when a name alone could be ambiguous or difficult to understand. For example, what would the trait orange mean? Is it the color orange or the fruit orange?
In such a case we'd use slash notation to separate them. color/orange and fruit/orange
Usage
To detect or check for trait items you just need to check the traits NBT of the item.
Detect if the player is holding a weapon
execute as @a if data entity @s SelectedItem.tag.ctc.traits."tool/weapon" run ...
This command detects if the item the player is holding has the trait tool/weapon.
Detect if the container contains copper ore
execute if block ~ ~ ~ Items[].tag.ctc.traits{"metal/copper": 1b, "ore": 1b} run ...
This command detects if the container contains an item with the traits metal/copper and ore
Detect if the container contains a placeable item
execute if block ~ ~ ~ Items[].tag.ctc.traits."block" run ...
This command detects if the container contains an item with the trait block.
While quotes around the trait are not necessary in all cases, I always keep them there to stay consistent.
Basic Traits
This is a provided list of traits that you can use. This doesn't mean you can't create new traits for your own use, but if there is a trait that suits your need in the list, you should use it.
The list is split into multiple groups and you should not use traits from the same group twice.
Object Type Group
This trait represents the state of the matter that this item holds.
| Trait | Description |
|---|---|
| gas | Gaseous substance |
| liquid | Liquid substance |
| block | Placeable item |
| item | Normal minecraft item |
Special Type Group
This group represents common traits from Minecraft.
This group is an exception to the rule above, you can use multiple traits from this group as much as you like.
| Trait | Description |
|---|---|
| ore | Ore block that can usually be found in caves |
| seed | Item that can be used to grow plants |
| flower | Flower item |
| grass | Block that can spread from one block to another |
| sapling | Block that can grow into a tree |
| vegetable | Food item that comes from seed |
| log | Item that drops from tree trunk |
| planks | Item that comes from processing log |
Compression Group
This trait represents an item that can be combined to create a more compact version of itself and vice versa.
For example:
redstone dust->redstone blockice->packed iceiron block->iron ingot
| Trait | Description |
|---|---|
| packed | Most packed form of item, usually a block |
| ingot | Normal form of item, usually an ingot |
| nugget | Smallest form of item, usually a nugget |
Edible Group
This trait represents an edible item that can be used by the player (drinking included).
| Trait | Description |
|---|---|
| food | All types of edible item |
Armor Group
This trait represents an item that can be worn by players and other entities.
| Trait | Description |
|---|---|
| armor | All types of wearable item |
Tool Sub-group
This trait uses Slash Notation!
This trait represents an item that can be used to interact with the world.
| Trait | Description |
|---|---|
| tool/mining | This item can be used to mine stone-like blocks |
| tool/chopping | This item can be used to cut wooden blocks |
| tool/tilling | This item can be used to till soil |
| tool/watering | This item can be used to water soil |
| tool/weapon | This item can be used to fight monsters and other players |
Gem Sub-group
This trait uses Slash Notation!
This trait represents any item that has a crystalline structure.
| Trait | Description |
|---|---|
| gem/diamond | Diamond gemstone |
| gem/ruby | Ruby gemstone |
| gem/emerald | Emerald gemstone |
| gem/sapphire | Sapphire gemstone |
| gem/prismarine | Prismarine |
| gem/lapis | Lapis Lazuli gemstone |
| gem/obsidian | Any Obsidian material |
| gem/quartz | Any Quartz material |
| gem/opal | Opal gemstone |
Metal Sub-group
This trait use Slash Notation!
This trait represents common metallic items.
| Trait | Description |
|---|---|
| metal/iron | Item made up of iron |
| metal/gold | Item made up of gold |
| metal/copper | Item made up of copper |
| metal/aluminium | Item made up of aluminium |
| metal/tin | Item made up of tin |
| metal/silver | Item made up of silver |
| metal/lead | Item made up of lead |
| metal/nickel | Item made up of nickel |
| metal/platinum | Item that made up of platinum |
Reference
CTC Examples
Traits are really just a normal NBT stored inside the item, nothing is special about them from the minecraft engine but we make this convention to standardize a way to communicate using these NBT.
There are two ways to use this nbt in your datapack, as a "producer" and a "consumer".
- For the producer, you will specify the necessary traits into your custom item and tell the consumer how to handle your custom item using those traits.
- For the consumer, you will write a code to check for those traits and handle them accordingly.
Creating a custom item
Since trait is really just a normal NBT in an item. When you want to create a custom item you just need to attach the ctc field to it as well.
/give @s diamond_sword{CustomModelData: 1234567, ctc: {id: 'light_saber', from: 'example:light_saber', traits: {'tool/weapon': 1b, 'metal/platinum': 1b}}, display: {Name: 'Light Saber'} }
#                                 ^^^^^^^        ^^^^^^^^^^^^^^^^^^^^^^^^^^^^^^^^^^^^^^^^^^^^^^^^^^^^^^^^^^^^^^^^^^^^^^^^^^^^^^^^^^^^^^^^^^^^^^^^^^^^^^^^
#                                  ^ You might want your custom item to have a custom texture         ^
#                                                                                                     ^ The ctc field
Or you can specify it in the loot table form like this
{
	"pools": [
		{
			"rolls": 1,
			"entries": [
				{
					"type": "minecraft:item",
					"name": "minecraft:diamond_sword",
					"functions": [
						{
							"function": "minecraft:set_nbt",
							"tag": "{CustomModelData: 1234567}"
						},
						{
							"function": "minecraft:set_nbt",
							"tag": "{ctc: {id: 'light_saber', from: 'example:light_saber', traits: {'tool/weapon': 1b, 'metal/platinum': 1b}}}"
						}
					]
				}
			]
		}
	]
}
Checking for trait item
This check is usually used for checking a general item that might be from other datapack as well.
Suppose we are creating a datapack that will display some special effect when the player is holding a weapon (i.e. health indicator, but that's left to the implementation).
In this case, we can take advantage of the tool/weapon trait but do note that you also need to take vanilla's weapon into account as well.
We will write a function that is called on the player and check if it should display that special effect:
# First, check for non-ctc vanilla items to see if the player is holding a weapon
execute unless data entity @s SelectedItem.tag.ctc if predicate example:is_holding_weapon run function example:display_special_effect

# Then check for the actual trait
execute if data entity @s SelectedItem.tag.ctc.traits{'tool/weapon': 1b} run function example:display_special_effect
if predicate example:is_holding_weaponis a pseudo-predicate that check whether the player is holding a weapon in their handfunction example:display_special_effectis a pseudo-function that execute the core feature of this datapack, the implementation of this function is irrelevant to this example.
Checking for trait item inside your datapack
There are situations where you only want to check for your own custom item and not other similar trait items. In this case, you can just check for the ctc.id and ctc.field directly.
The rule for when to use a trait check or an explicit check is basically about whether it's "external" or "internal".
Only use trait check for the function that wants to support other external items and only use explicit check for internal implementation that would cause a problem if it were other items.
The Misconceptions
-
The convention does not have a limited set of traits you can use.
The convention itself only enforce the syntax of thectcfield, the traits provided in the convention is simply a commonly used one but you are free to create new trait as you see fit. -
The convention is an opt-in system where you can specify what kind of behavior do you want from other datapacks.
You are not required to correctly set the traits of your custom item base on its material or texture. The choice of choosing the trait for a custom item is on the author of the datapack.
Custom Model ID (***)
About
This convention aims to reduce conflict between resource packs within the custom model data system as much as possible by assigning a unique ID for every creator to use.
1. Register your ID
Your "id" is an integer between 1-999 which we'll use as a unique namespace.
You can register your ID at https://mcdatapack.vercel.app/.
2. Prefix your model with your id
You will prefix your custom model data with your ID in this format, where XXX is your ID and 0000 is your unique custom model data.
| id | cmd |
|---|---|
| XXX | 0000 |
Here are some examples:
2.1. id = 42
{
    "overrides": [
        {"predicate": {"custom_model_data": 420001}, "model": "path/to/model/1"},
        {"predicate": {"custom_model_data": 420020}, "model": "path/to/model/2"},
        {"predicate": {"custom_model_data": 420300}, "model": "path/to/model/3"}
    ]
}
2.2. id = 808
{
    "overrides": [
        {"predicate": {"custom_model_data": 8081001}, "model": "path/to/model/1"},
        {"predicate": {"custom_model_data": 8082002}, "model": "path/to/model/2"},
        {"predicate": {"custom_model_data": 8083003}, "model": "path/to/model/3"}
    ]
}
2.3. id = 1
{
    "overrides": [
        {"predicate": {"custom_model_data": 10001}, "model": "path/to/model/1"},
        {"predicate": {"custom_model_data": 10010}, "model": "path/to/model/2"},
        {"predicate": {"custom_model_data": 10011}, "model": "path/to/model/3"}
    ]
}
Note
This convention does not enforce any restrictions from the 8th digit onwards. Datapackers could utilize this to gain a few more model slots if they wanted to. (the digit index is count from right-to-left of course)
Global Ignoring Tag (***)
About
This convention provides a way for datapacks to communicate with each other by specifying entity tags which other datapacks can then look for. This is used heavily to prevent other datapacks from killing/removing custom entities from the world unexpectedly.
There are currently 4 ignoring tags: global.ignore, global.ignore.pos, global.ignore.gui and global.ignore.kill.
1. global.ignore.kill
Any entity with this tag must not be killed by other datapacks. This includes, but is not limited to, the /kill command.
execute as @e[type=creeper, tag=!global.ignore, tag=!global.ignore.kill] run kill @s
2. global.ignore.gui
Any entity with this tag must not display visual effects around them. This includes, but is not limited to, the /title command.
execute as @a[tag=!global.ignore.gui] at @s run title @s actionbar [{"text": "Hello, World!", "color": "green"}]
This excludes the
/playsound,/tellrawand/particlecommands.
3. global.ignore.pos
Any entity with this tag must not be moved positionally. This includes, but is not limited to, the /tp and/teleport commands.
execute as @e[type=witch, tag=!global.ignore, tag=!global.ignore.pos] at @s run tp @s ~ ~0.1 ~
4. global.ignore
Any entity with this tag must not be included in an entity selector at all.
execute as @e[tag=!global.ignore] at @s run function namespace:internal/logic/function
This tag does not apply to player-only selectors (
@a,@e[type=player],@p, etc.)
Note
The convention only applies if your function will affect an unknown entity. If you are trying to target a known entity (e.g. an entity with a special tag attached specific to your datapack), you don't need to follow this convention.
Global Durability (*)
About
This convention extends the functionality of the Common Trait Convention by providing a syntax for "custom durability" which can be useful for datapacks that add tools that have durability.
Implementation
The convention uses the ctc tag from the Common Trait Convention, as follows:
{
    ctc: {
        tool: {
            damage: 0,
            durability: 0,
            broken: false
        }
    }
}
Where:
damageis the current damage of the tool, functionally the same as vanilla'sDamagetag counterpart.durabilityis the maximum durability of the tool or the maximum damage the tool can take.brokenis a boolean specifying whether the item is "broken" (i.e. Broken Elytra). This tag can be used in the case where you don't want to destroy the item when it runs out of durability.
Note
The convention only enforces where the tag should be, it does not enforce the method by which you reduce durability. It also does not require that you have to keep damage and the vanilla Damage tag in sync.
Namespace Convention (***)
About
This convention aims to prevent conflict when deciding the name for your scoreboards, functions, storages, etc. by using a "namespace prefix".
Implementation
A namespace prefix must be used whenever it is possible. This includes tags (datapack), tags (/tag), nbts, scoreboards, functions, advancements, loot tables, structures, world generation settings, recipes, data storage.
There is no rule specifying how you should design your namespace prefix, but these are some of the examples:
scoreboard objectives add bb.var dummy
In this example bb is the namespace which is shortened from boomber due to 16 characters limitation. I like to keep the scoreboard namespace short and use . to seperate the namespace from the name.
tag @s add boomber.foo.bar
In this example, I use a full boomber prefix, because tags don't have a character limit.
data merge storage boomber:foo/bar {}
In this example data storage already has support for namespacing, so I don't need to use a prefix.
give @s diamond{boomber: {custom_data: 123}}
In this example, I wrap the custom_data nbt inside another tag, allowing it to act as a namespace.
The above examples are my style of namespacing, but there are many other approaches that you can take, such as namespace_foo, NAMESPACEfoo, namespace.foo, namespace:foo and namespace/foo. Your imagination is the limit!
Note
Using minecraft namespace to modify vanilla's behavior is a special case and it is allowed within a reasonable situation.
However, for example, setting "replace" to true in the tick.json function tag is not a "reasonable situation", because that would prevent other datapacks from working.
Shulker Box Loot Table (***)
About
This convention aims to make Shulker Box Inventory Manipulation as conflict-free as possible by enforcing a specific loot table for the minecraft:yellow_shulker_box block.
Implementation
Simply use this loot table inside /data/minecraft/loot_tables/blocks/yellow_shulker_box.json when you want to use the Inventory Manipulation trick.
{
  "type": "minecraft:block",
  "pools": [
    {
      "rolls": 1,
      "entries": [
        {
          "type": "minecraft:alternatives",
          "children": [
            {
              "type": "minecraft:dynamic",
              "name": "minecraft:contents",
              "conditions": [
                {
                  "condition": "minecraft:match_tool",
                  "predicate": {
                    "nbt": "{drop_contents: 1b}"
                  }
                }
              ]
            },
            {
              "type": "minecraft:item",
              "functions": [
                {
                  "function": "minecraft:copy_name",
                  "source": "block_entity"
                },
                {
                  "function": "minecraft:copy_nbt",
                  "source": "block_entity",
                  "ops": [
                    {
                      "source": "Lock",
                      "target": "BlockEntityTag.Lock",
                      "op": "replace"
                    },
                    {
                      "source": "LootTable",
                      "target": "BlockEntityTag.LootTable",
                      "op": "replace"
                    },
                    {
                      "source": "LootTableSeed",
                      "target": "BlockEntityTag.LootTableSeed",
                      "op": "replace"
                    }
                  ]
                },
                {
                  "function": "minecraft:set_contents",
                  "entries": [
                    {
                      "type": "minecraft:dynamic",
                      "name": "minecraft:contents"
                    }
                  ]
                }
              ],
              "name": "minecraft:yellow_shulker_box"
            }
          ]
        }
      ]
    }
  ]
}
Reference
Global Forceload Tag (***)
About
This convention requires data packs which force-load chunks to communicate their presence and ensure that chunks are only removed from being force-loaded when they do not need to be force-loaded by any data pack.
Implementation
When running /forceload add, the programmer must spawn a tagged entity or tag an existing entity with global.forceload in the same chunk and within the same tick that the chunk was added. This entity's entire hitbox must reside in the chunk at all times.
forceload add ~ ~
summon marker ~ ~ ~ {Tags:["dp.example","global.forceload"]}
In the above example, a marker (which the datapack can find later with the dp.example tag) is summoned when we begin force-loading the chunk.
And when running /forceload remove, the programmer must first un-tag or kill their tagged entity and check at least all blocks in a vanilla-sized chunk (y=-64 to 320) for any other entities tagged global.forceload. If an entity is found, the chunk should remain force-loaded.
# executed as our "marker" anywhere in the chunk
# "math" is a dummy objective

tag @s remove global.ignore

# Constant chunk width
scoreboard players set #16 math 16

# Align marker to X chunk border
execute store result score #pos math run data get entity @s Pos[0]
scoreboard players operation #pos math /= #16 math
execute store result entity @s Pos[0] double 16 run scoreboard players get #pos math

# Align marker to Z chunk border
execute store result score #pos math run data get entity @s Pos[2]
scoreboard players operation #pos math /= #16 math
execute store result entity @s Pos[2] double 16 run scoreboard players get #pos math

# Align marker to lowest Y block
data modify entity @s Pos[1] set value -64.0d

# Check region
execute at @s unless entity @e[tag=global.forceload,dx=15,dy=319,dz=15] run forceload remove ~ ~

kill @s
In the above example, we used the original entity (tagged dp.example in the earlier example), so we had to remove the global.forceload tag prior to checking the region. This isn't required and a new entity could be spawned in if the previous entity is still needed.
We used some scoreboard math to move the entity to the negative-most edge of the chunk, then used volume selectors to test the region. As for why the volume selectors are one less than expected, see MC-123441.
Style Guideline
The guideline is an extension of the certified datapacks system. It contains information about how you should design a datapack for consistency with other datapacks.
Following this guideline will not necessarily improve compatibility between datapacks, but it will improve consistency in design between datapacks.
The guideline is separated into multiple pages for readability, you can find them here:
Datapack Advancement
You must implement the Datapack Advancement convention as shown in that page. It group every installed datapacks in one place that is easily accessible for anyone.
Datapack Uninstallation
You must implement the Datapack Uninstallation convention as shown on that page and also tell the users how they can uninstall the datapack in the project page.
Reloading Message
You must not send an automatic message when the world is reloaded. It will clutter the chat unnecessarily and create a bad experience for the users.
Most of the time, the message will be an installation message, in which case you can use Datapack Advancement instead.
Certified Datapacks
-
Datapacks that have followed the bare metal Tier 3 conventions are allowed to use this banner

-
Datapacks that have followed the Tier 3 conventions and All of style guideline in the Style Guideline section can use this banner.

Certified Datapacks have the benefit that they are guaranteed to be compatible with other datapacks.
Social Media
We have created an "official tag" for various platform that you can include to indicate that your content is certified.
You must not use these tags in an attempt to appear as certified if your datapack is not certified!
The following tags should be self-explanatory but if you feel that it isn't, please report this.
- GitHub:
mcdp-certifiedandmcdp-quality - Twitter:
#CertifiedMCDatapackand#QualityMCDatapack - PlanetMinecraft:
mcdp_certifiedandmcdp_quality
We also have the official account on these platform as well:
- Twitter: @mcdatapacks
- GitHub: @mcdatapack
- PlanetMinecraft: mcdatapack
Requirement
A datapack must satisfy these requirements to receive the Certified Datapack title
- Datapack must be portable, it must not be tied down to a specific save.
- Datapack must follow all of Tier 3 Conventions.
Note
- We may rule a datapack out at our discretion, for reasons we would then specify.
- This requirement is not final and can be changed in the future.
Tips
Various tips and tricks for developing datapacks.
Enum Scoreboard
You can use a fake player to represent a state on your scoreboard instead of using the number directly. This can make your code more readable and increase future maintainability.
Declaring enum
scoreboard players set #state.idle bb.enum 1
scoreboard players set #state.foo bb.enum 2
scoreboard players set #state.bar bb.enum 3
The enum can hold any value that you want as long as it's unique. We only care about the fake players existing and having values that can be told apart.
Using enum state
execute if score @s bb.state = #state.idle bb.enum run function <idle_state>
execute if score @s bb.state = #state.running bb.enum run function <running_state>
execute if score @s bb.state = #state.stopping bb.enum run function <stopping_state>
Here we check the state of @s and run a corresponding function based on its state. The benefit of using the enum pattern here is that we can assign names to the different expected states.
Shulker Box Inventory Manipulation
About
This technique allows us to manipulate the player's inventory just like any other NBT using the shulker box's loot table.
Concept
We take advantage of the fact that the shulker box can be configured to drop their content on the ground instead of dropping a shulker box containing its content, which can then be used by the /loot command to replace the player's inventory.
Implementation
1. To comply with the Official Conventions, you will have to modify the loot table of minecraft:yellow_shulker_box to the loot table below. The loot table will drop its content on the ground when it's mined by an item with NBT {drop_contents: 1b}. For compatibility reasons, air must be used as the item.
2. Create a placeholder shulker box that you will use to modify the player's inventory. Usually, this should be placed far away from the player's view, but for simplicity's sake, I'll place it at ~ ~ ~.
setblock ~ ~ ~ minecraft:yellow_shulker_box
3. You need to clone the player's inventory into some sort of NBT buffer, you can clone this into a data storage since they are faster.
data modify storage <storage> inventory set from entity <player> Inventory
4. Due to a limited number of slots inside the shulker box, you have to process the NBT in "batches". The easiest way to organize these batches can be done by splitting it into "hotbar", "inventory", "armor" and "offhand" batches.
4.1. Create each batch using these commands.
                                      |--- Batch name                                     |---- Slot number
data modify storage <storage> batch.hotbar append from storage <storage> inventory[{Slot: 0b}]
data modify storage <storage> batch.hotbar append from storage <storage> inventory[{Slot: 1b}]
data modify storage <storage> batch.hotbar append from storage <storage> inventory[{Slot: 2b}]
.
.
.

// Don't forget to remove the `Slot` NBT from the item before moving to the next step!
data remove storage <storage> batch.hotbar[].Slot
4.2. Modify the NBT of each item however you like it to be.
5. Copy the NBT from the previous step into the shulker box and then replace the player's inventory.
data modify block ~ ~ ~ Items set from storage <storage> batch.hotbar
loot replace entity <player> hotbar.0 9 mine ~ ~ ~ air{drop_contents: 1b}

data modify block ~ ~ ~ Items set from storage <storage> batch.inventory
loot replace entity <player> inventory.0 27 mine ~ ~ ~ air{drop_contents: 1b}

data modify block ~ ~ ~ Items set from storage <storage> batch.armor
loot replace entity <player> armor.feet 4 mine ~ ~ ~ air{drop_contents: 1b}

data modify block ~ ~ ~ Items set from storage <storage> batch.offhand
loot replace entity <player> weapon.offhand 1 mine ~ ~ ~ air{drop_contents: 1b}
Note: Notice the slots I used in each /loot command?
6. Cleaning up
setblock ~ ~ ~ minecraft:air
data remove storage <storage> batch
data remove storage <storage> inventory
Note
In this example, I assume that you need to modify NBT of all available slots, but if you want to, say, modify only items in your hotbar, then you don't need to use the unneeded batches, e.g. the "inventory", "armor" and "offhand" batches.
Holding Right Click Detection
About
This method allows you to detect when player is "holding" right click, using a carrot on a stick.
Note: I will be referring to "carrot on a stick" as "coas" from now on
Result
A simple spell casting system where a spell will be cast when the player holds right click for a period of time
Concept
To detect when player is holding right click, you need to know when player right clicks coas twice within a time threshold.
Because Minecraft takes in coas input every 4 tick, a right click is considered continuous if it's performed within 5 ticks of another click.
Implementation
1. Setup scoreboard objectives
#[setup]

#> This objective is used for detecting when the player is right clicking.
scoreboard objectives add <coas> minecraft.used:minecraft.carrot_on_a_stick

#> This objective will alway be more than 0 when the player is holding right click
scoreboard objectives add <timer> dummy
2. Detect right click
#[main]
execute if score @s <coas> matches 1.. run function [coas/reset_timer]
3. Detect holding right click
#[main]

# Decrease <timer> by one until it hits 0
scoreboard players remove @s[scores={<timer>=1..}] <timer> 1

# If <timer> is more than 0, we know that the player has right clicked within the last 5 ticks.
# (Since <timer> decrease by 1 every tick and every time a right click is performed <timer> is set to 5 again.)
execute if score @s <timer> matches 1.. run say Player is Holding Right Click!
#[coas/reset_timer]

# Set <timer> to 5 and <coas> to 0
scoreboard players set @s <timer> 5
scoreboard players set @s <coas> 0
5. Conclusion
If <timer> is more than 0, we know that the player has right clicked within the last 5 ticks, since <timer> decreases by 1 every tick, and every time a right click is performed <timer> is set to 5 again.
We can use execute if score @s <timer> matches 1.. to know if <timer> is more than or equal to 1.
Note
<...>is a placeholder value that you have to replace with your own value.[...]is a placeholder path to display relationship between each functions.
Example Datapack
You can download the example datapack here.
This example pack contains extra code used to display the title message to player.
Happy Datapacking! - Cocoon